


Think about why you are starting a blog
Do you want to communicate something, like a message or an idea? Do you want to build a community around a topic you enjoy?
A blog can help you to accomplish many things, such as: inform, educate, promote and even sell.
Here are some reasons why many people create a blog and enjoy blogging:
- To use it as an outlet for creative expression.
- To establish expertise and build an audience.
- To network with others and grow a business.
- To enhance writing and thinking skills.
- To become self-employed or make more money.
Blogging has a lot of benefits, and for some people, it can be a great way to earn extra income online.
A quick primer – Blogging for beginners
All in all, there are four important steps to understanding “how to make a blog” quickly. If you are familiar with these things, you can set up a blog in 15-20 minutes or even less:
- Pick a blogging niche (topic)
- Select the best blog platform
- Get a domain and web hosting
- Install WordPress software
Creating a blog is your first step in entering the blogging world. However, to be successful online you have to learn more. There are more than 100 free guides and resources on FirstSiteGuide to help you to succeed on the web!
Step #1: Pick a niche for your blog
Before you build a blog and make it as a blogger, you must select a blogging niche.
In simple terms, a blog niche is a specific topic you will write about most often, or even exclusively.
To pick the right niche for your new blog, begin by listing all the topics that excite you and make you want to talk about them. There are no restrictions – you can include any personal or professional interests in this list.
- Think of things that you enjoy doing in your spare time. For example, are you an amateur photographer or an avid programmer?
- Consider all of the things that you would like to learn. For example, do you aspire to take cooking classes and become a better cook?
- Lastly, contemplate all of your plans and projects. For example, do you plan to return to college to complete your education?
There are no restrictions – you can include any personal or professional interests on the list.
This simple exercise will help you select a niche you are the most interested in. That way you will follow your passion and enjoy your blogging journey.
Step #2: Choose a blogging platform
At this stage, you’ll need to look at the currently available blogging platforms and determine the type of blog management software you will use.
When it comes to blogging sites, you have a few options. Below are usage statistics showing the distribution of blog technologies in the United States.
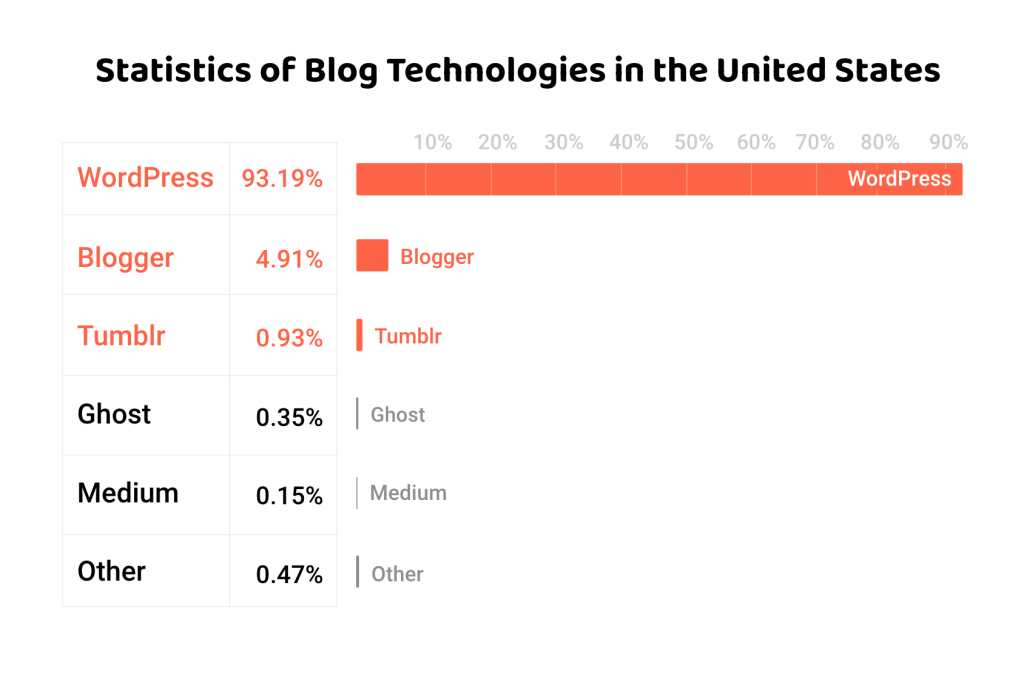
As you can see from the graph, WordPress software is by far the most popular technology for blogging, with over 90% market share in the U.S.
I recommend building your blog using the self-hosted WordPress blog setup that I share in this guide.
You will set up your blog using a custom domain name and web hosting (I’ll show you how in the next step).
That way, you will completely control your blog and its contents. It will cost just a few dollars per month for the webspace (hosting account) and around ten dollars per year for a domain. The actual blogging software is free and open source.
What about free blogging sites?
For many new bloggers, it’s tempting to start a blog using free-hosted platforms such as Blogger or Tumblr.
However, it’s important to understand that “free” always comes with limitations:
- First, your blog name will be set as a subdomain (examples: “yourblog.blogspot.com” or “yourblog.tumblr.com“).
- Second, you’ll be subject to their rules and restrictions.
Free options come in handy for testing a blogging platform. But if you’re serious about starting a blog, you’ll have to start paying for full services and a custom domain name sooner or later.
Step #3: Choose a domain name and get blog hosting
To make your blog using WordPress.org, you need two important things: a domain name and a web hosting company.
Domain name
Your domain name will be the name by which you will be known online, no matter what niche you choose. It’s your blog’s unique address on the Internet.
Here’s what you should consider when choosing a blog name:
- It should be short and catchy, easy to pronounce and type.
- You can also use combinations of your first and last names (e.g. johnsmith.com or tim.blog).
The general rule is to get a “.com” domain, but some other extensions can also be used. For example, “.net” or “.blog.” Ultimately, it’s about being memorable, so if a different extension helps you stand out, then break the rules!
Have a name idea for your blog? Use this quick domain search tool powered by Bluehost – our recommended web hosting provider (I’ll explain why in a moment).
If you can’t find a domain name you like, don’t worry. Bluehost lets you choose a Free custom domain later before your blog goes live. That will give you time to do some thinking and research.
Web hosting
After choosing a domain name, selecting a reliable hosting service will be one of your most important decisions.
To a great extent, the functionality and performance of your blog will depend on your hosting provider. The host makes sure that your blog is available 24/7 to potential readers and it’s where your content is stored online.
If you are a new blogger, I suggest using Bluehost hosting.
Here is why you should be confident going with this company:
- Ease-of-use: With Bluehost, you will be able to set up your blog with a few clicks of a button.
- Good value: You get reliable service with excellent customer support at an affordable price.
- Room to grow: They offer a great set of features that you need to start, run, and grow your blog.
- Security: Free SSL certificate included and pre-installed to keep your blog visitors data safe.
- Verified provider: Bluehost is a recommended hosting provider on the official WordPress.org website.
- Used by many: I use their services, as do many blogger friends and family members.
- Survey winner: Based on our research, Bluehost is a top choice in the opinion of many blogging experts.
Step #4: Start a blog by setting up WordPress
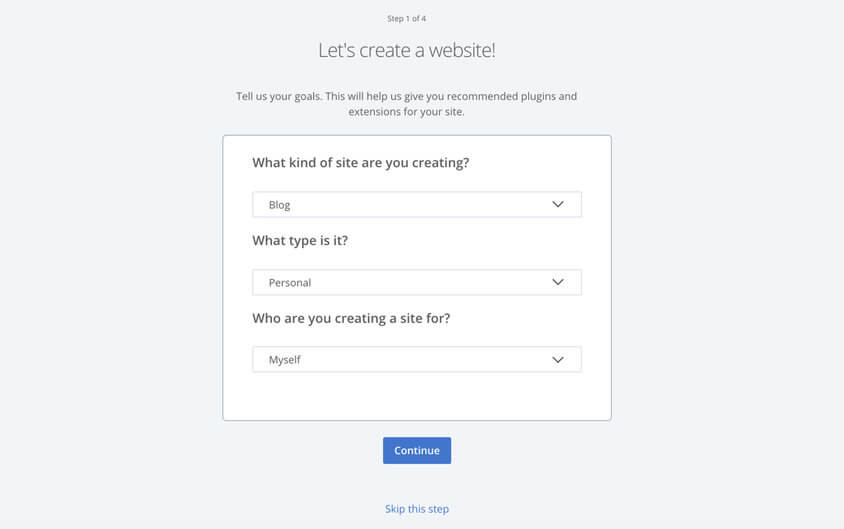
Once you log in to your web hosting account, Bluehost will offer a 4-step process to help you create a blog. I suggest that you go with this procedure if this is your first time starting a blog.
You can also click the “Skip this step” button and work on blog construction on your own inside your Bluehost hosting account.
Four steps blog set up assistance process:
- Step 1. You will start this process by answering 3 questions: What kind of site? What type is it? And who is it for? In my example, I selected: Blog, Personal, Myself. You can select the same choices or pick what fits your individual case.
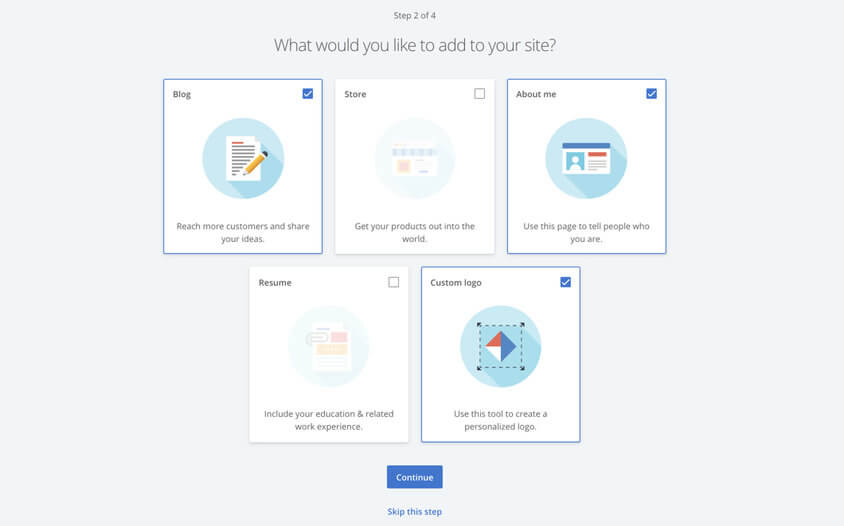
- Step 2. With this step, you can choose what else to add to your site. Bluehost gives you a few options to choose from.
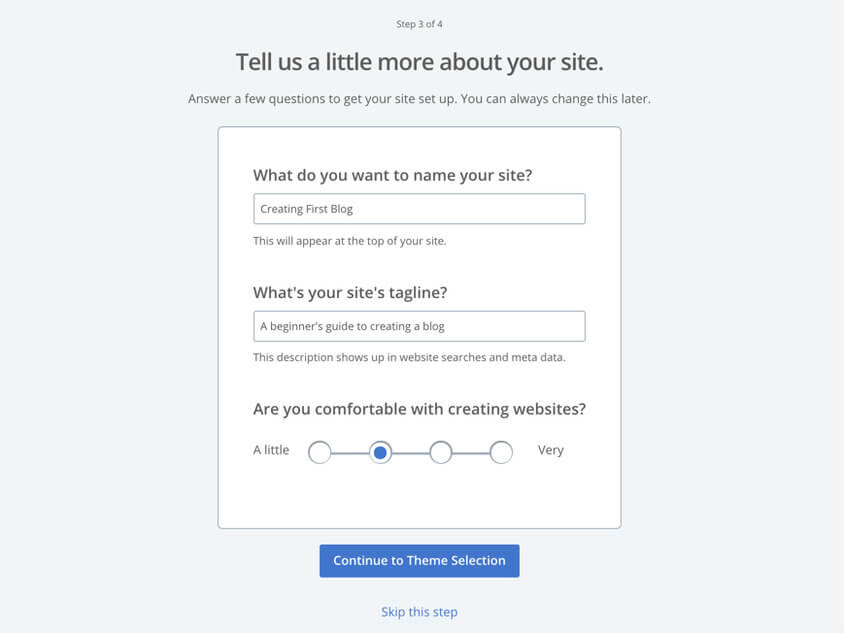
- Step 3. In this step, you need to answer a few questions such as the name of your blog, tagline, and how comfortable you are with creating websites. Note: you can always change this later.
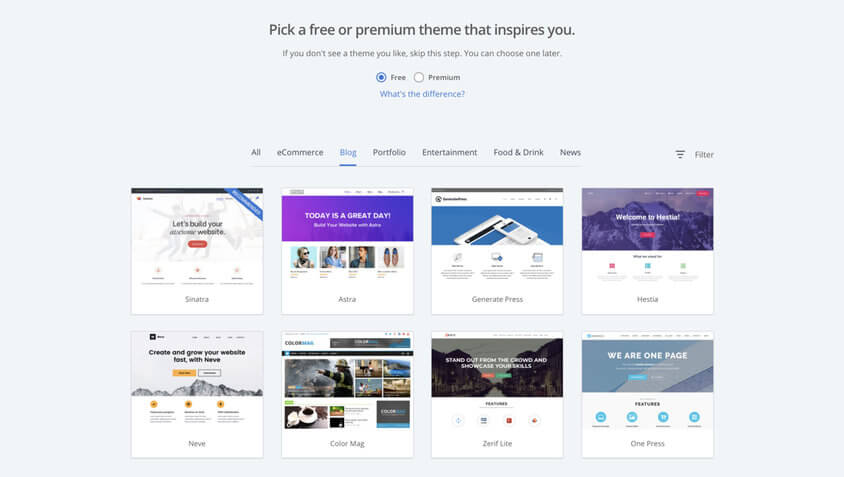
- Step 4. Check out the suggested themes from Bluehost and see if you like any of them (if you don’t see a theme you like, skip this step). You can always change your theme and use a different one later. More information on this further on.
Once you finish setting up your blog with these 4 steps, you will be taken to your Bluehost account page. At this point, the WordPress software is installed and your blog structure is set up!
Launch your blog
Inside your Bluehost account, you can customize your WordPress blog site further based on Bluehost’s recommendations. These options are here for you to do some pre-launch customization to your blog.
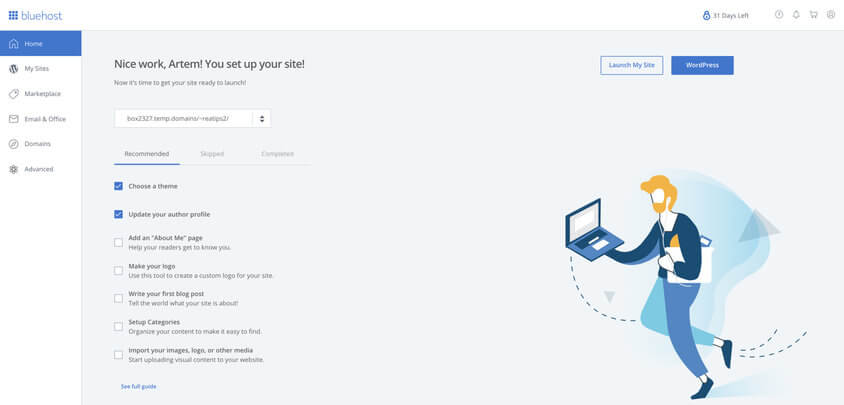
Your blog will go live after you click the “Launch My Site” button!
If you open your website in a web browser, don’t get frustrated if it doesn’t look quite right. This is just the first draft. Inside the WordPress dashboard, you will have to apply a few changes and add some content to make it look polished and complete. I will show you how to do this later!
You can access the WordPress blog dashboard from your Bluehost account by clicking the blue “WordPress” button in the top right corner of your screen.
Did you start a blog yet? → Click Here to Get Started
Next, as promised, I’ll show you how to find the right theme for you, and how to customize your blog.
Step #5: Select a theme and design your blog
Your blog first needs a face (design and layout).
Installing a new WordPress theme is exciting and fairly straightforward.
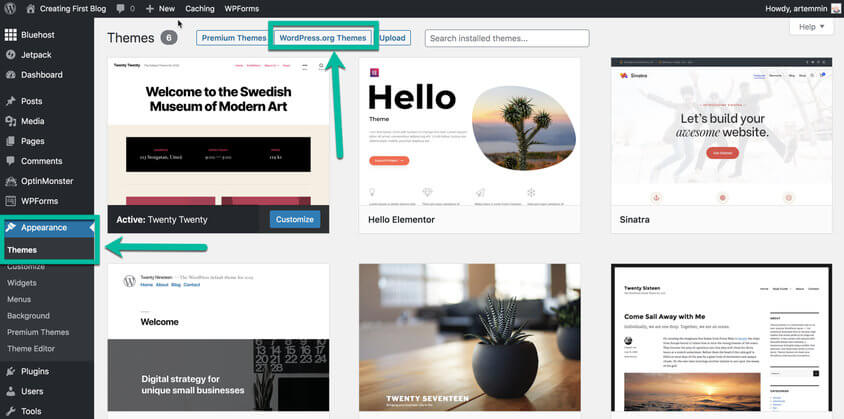
Inside the WordPress dashboard, under the “Appearance” tab, click “Themes”. You will be presented with some popular options. You can click on the WordPress.org Themes button and search for free themes. There are more than three thousand themes available on WordPress.org.
The look and feel of your new blog rely on the theme you choose. Your first-time readers will notice its overall appearance before they even look at the content. Select a theme that looks great, but also works for your specific needs.
Here’s a quick guide for choosing your theme by searching within the WordPress dashboard:
- Read the description – Most themes have a short description of features and functionality. Reading it can help you to figure out if the theme matches your needs.
- Preview the theme – Preview the theme (demo) to get an idea of the overall look, layout, and how customizable it is.
- Check the ratings – Star ratings will be visible in the preview and under theme details to give you a clear idea of how good the theme is.
If you can’t find a theme that you absolutely love, don’t worry. Settle on one that you like, and you can always change it in the future.
Once you install a theme, don’t be surprised if it still doesn’t look quite right. It is just a skeleton of a blog. You’ll have to fill it in with content (text, photos, videos, etc.) to make it appealing.
Should you choose a free or premium theme?
I think there are more than enough free WordPress themes to choose from for any blog topic.
If you don’t feel like searching through thousands of themes, you can easily start things off with either Twenty Twenty or Twenty Twelve themes. Both free themes are presented by WordPress.org and are popular with creators.
Remember, you can always pick a different theme later as you continue setting your blog. All the pages and unique content you create will be transferred automatically to a new theme layout.
If the current stash of free themes does not satisfy your desire, you can check the premium themes available. These themes are usually designed by third-party companies and sold on different WordPress theme sites. The price range for single-use licenses ranges from $30 to $500, depending on which premium theme you choose.
Read more:Blog theme customization
Remember, your WordPress dashboard is the back-end location where you will manage your new blog. It provides you with fast access to all of the tools you need to add content and fine-tune your blog functionality for the ultimate user experience. Your first step towards mastering WordPress is learning the dashboard.
WordPress has unlimited customization options so it’s impossible to cover everything in this “How to start a blog” guide. Instead, I’ll cover the first most important changes you should apply to your blog. For this example, I’ll be using the Twenty Twenty theme.
Make your blog’s logo
You can find the “Make your logo” tool in your Bluehost account. If you didn’t do it while launching your blog, now is the time to finish it.
Once you click the checkbox, you will be taken to an AI-powered logo maker. It’s an easy-to-use tool that you can use to create a beautiful logo for your blog in seconds. Start by entering a name and slogan (if you have one), the tool will automatically generate different types of logos.
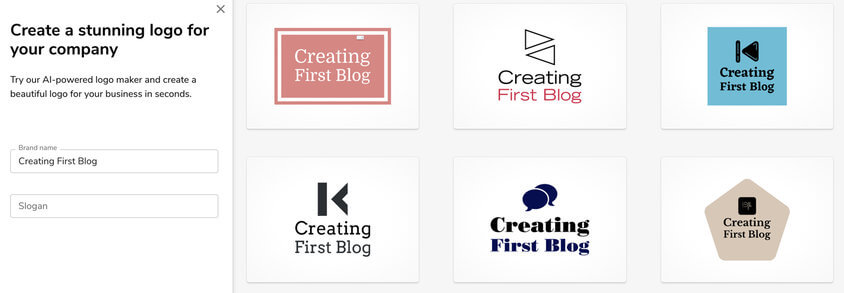
Select one logo you like the most, click on it, and further customize it according to your taste.

When you are done with your logo design, click the Download button and a new page will show up with your logo files ready to be saved to your computer.
Customize your blog
Now, let me show you where you can do general customizations of your blog. That includes: uploading the logo you just created (or will create in the future), editing the blog title and tagline, changing colors, uploading the background image, and making homepage settings changes.
As I’ve mentioned, I’ll be showing you how to apply these changes to the Twenty Twenty theme. If you picked a different theme the process could be slightly different. However, in most cases, all themes have similar customization options.
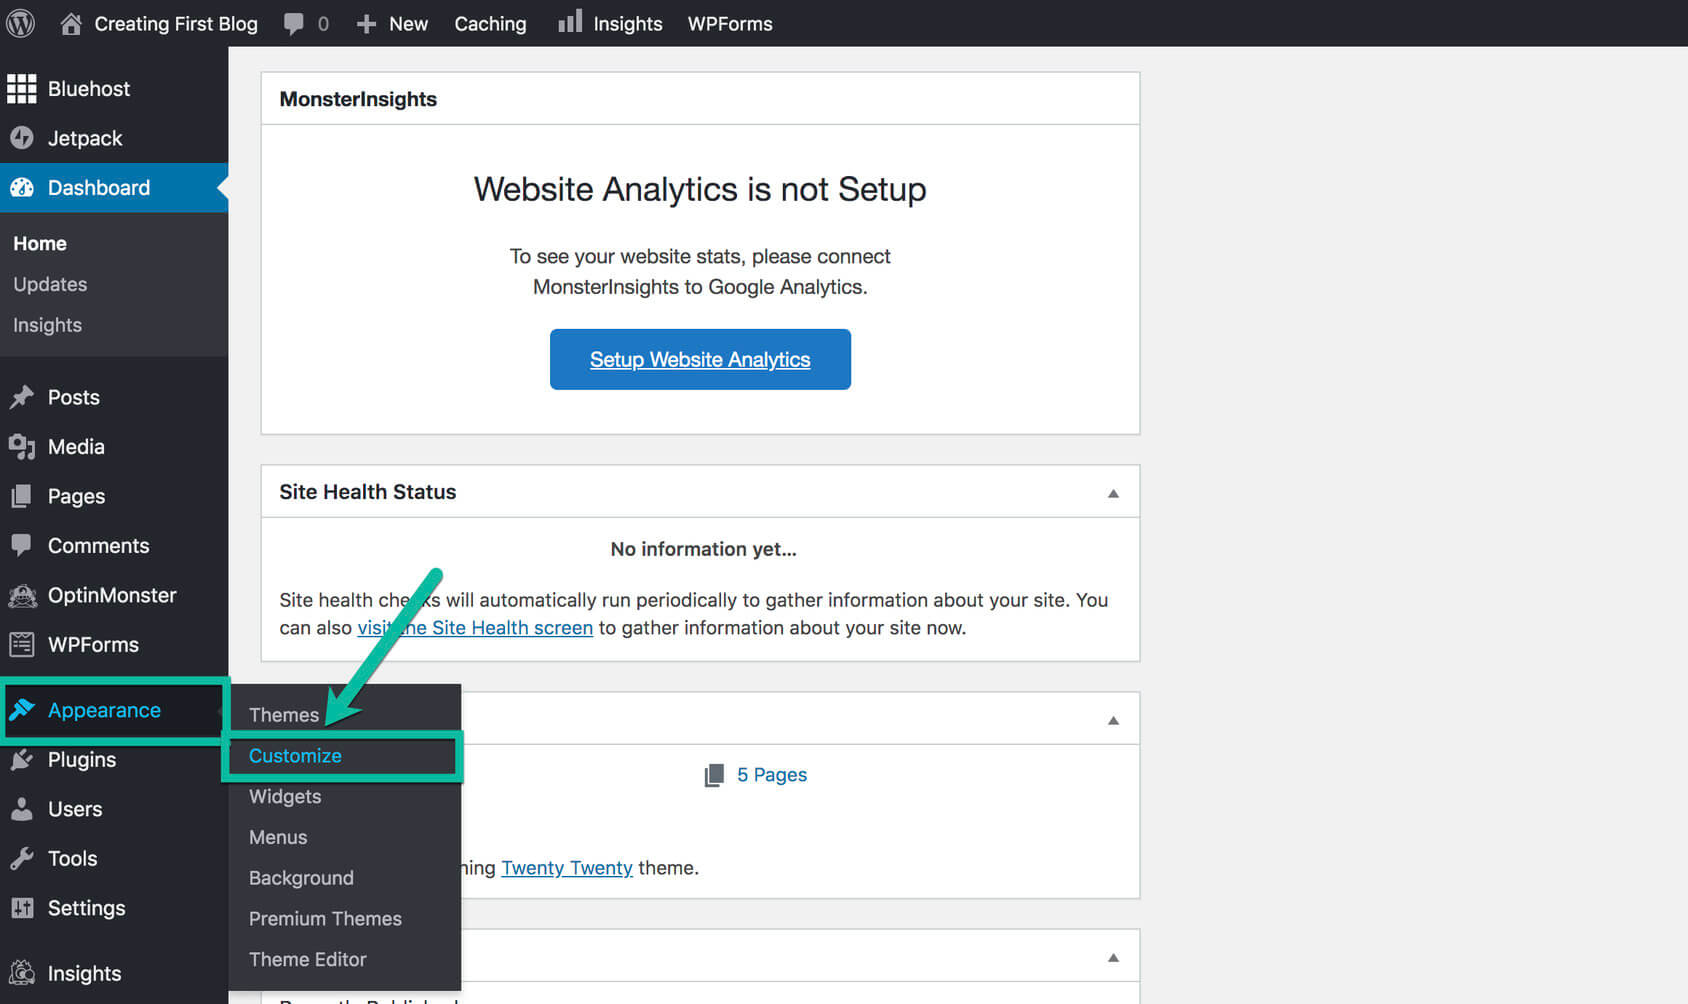
To start optimizing your blog, go to the WordPress admin dashboard. Locate the Appearance tab on the left-hand side and choose the Customize option.
Each WordPress theme will customize a little differently. In my case, I’ll show you the customize options for the Twenty Twenty theme.
On the left-hand side, you will see the following Customizing menu options:
- Site identity – Upload your logo, change site title and tagline, and upload site icon.
- Colors – Change your blog’s background color, header, and footer colors, and customize the primary color.
- Theme options – Select if you want to show a search icon in your blog’s header and show an author bio for your posts.
- Cover template – Make additional changes to the page template such as the overlay background color, overlay text color, and overlay opacity.
- Background image – Upload any custom background image you want to start using on your blog.
- Menus – Customize your blog’s menu, social media menu links, and change the locations where they are displayed.
- Widgets – Customize your footer, add a description, and how to find you if you have a physical location.
- Homepage settings – Choose what’s displayed on the homepage of a blog. It can be the latest blog posts or a static page.
- Additional CSS – Add your own CSS code to customize the appearance and layout of your site (advanced option).
You can also check how your blog looks on different devices by using the menu at the bottom with three icons: desktop, tablet, and mobile devices.
Many themes (e.g. the Twenty Twenty theme) come with the new Gutenberg editor that revolutionizes the way users build pages and write posts inside WordPress.
Gutenberg is a visual editor that works on a blocks principle. So, when you decide to add a new paragraph, heading, image, video, or anything else, there are blocks you can quickly add to new pages or blog posts.
This way, creating blog content is much easier for beginners, whether you’re building a landing page or writing a new article. Blocks can be rearranged into a layout you like, and they’re here to make your life easier.
Add plugins to your blog
Plugins are bundled pieces of code that affect how your site looks and functions. They can add new functionality to your WordPress blog, extend your theme’s capabilities, and personalize a blog as a whole or in part.
While the majority of plugins are free, there are many that are offered for a fee, based on their unique functionality. At the moment, WordPress.org has more than 57,000 different plugins in the repository.
By default, when you set up your blog, Bluehost will automatically add some plugins they think are important for any website. You can review these plugins inside the WordPress dashboard and add new ones by clicking the Plugins tab on the left-hand side.
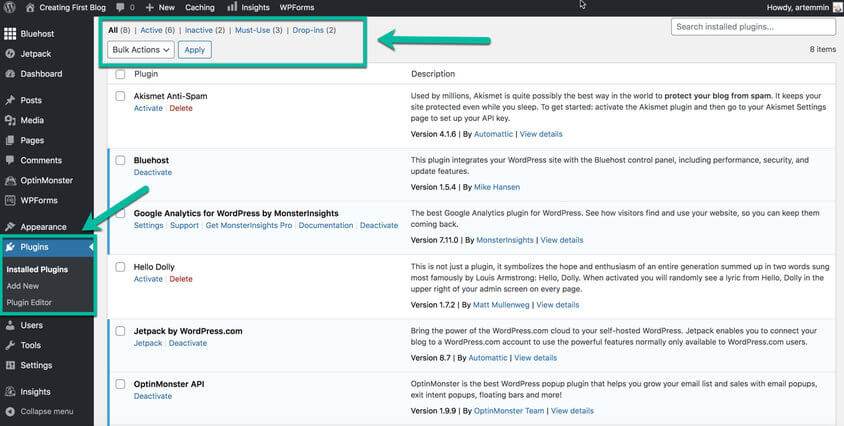
Here you can install new plugins, deactivate, delete, and update them.
Below, I’ll show you some suggested plugins that you should be using.
List of recommended plugins for bloggers
To save you time, I’ve selected some important plugins (free) for your immediate blogging platform needs:
- MonsterInsights – Google Analytics plugin for WordPress to monitor and analyze your website traffic.
- Yoast SEO – A comprehensive SEO plugin for your blog, to optimize your content for search engines.
- WP Super Cache – Helps with the load time of your WordPress blog and delivers content to your readers faster.
- Akismet – Protects your comments and contact form from spam and prevents your site from publishing malicious content.
- Contact Form 7 – A contact form with flexible email options. It supports CAPTCHA and Akismet spam filtering.
- Disqus – An alternative to the basic WordPress comment system with advanced administrative and comment capabilities.
- YARPP – Creates a related blog posts list at the end of each piece of content automatically to encourage people to continue browsing your site.
Congratulations, you just learned how to customize your blog and make web design changes!
The next step is to learn how to write content for your blog.
Step #6: Write and publish blog content
So far, you’ve established a domain name, chosen your blog hosting site, set up a blog theme, and you are ready to go. Your framework is complete.
Now comes the moment of truth and you can actually start blogging. You need to learn how to write your first blog post. On the web, any useful information or experience that you share with readers is called “content.” It must be something valuable that people will want to interact with and come back for more.
WordPress CMS is structured in a way that you can publish your content as Posts or Pages.
Before you begin publishing posts (day-to-day writing) on your blog make sure you fill in all the important static pages with content (such as About us, Contact, etc.). Let’s explore those types of pages.
Prepare and publish content on main pages
Depending on your individual needs you can decide what pages to publish. The following are the most common pages bloggers use:
- Homepage – This depends on what type of layout you choose. As I described above, when customizing your blog you can choose to display the homepage as a static page. In that case, you will have to prepare content for it.
- About us – The most traditional page on any blog is the “About us” page. This page tells new visitors what it is all about, who you are and why you run a blog about your niche topic.
- Contact – This page allows visitors to your blog to communicate with you. It can be a straightforward page with your email address plus your social network links, or you can use a simple contact form that visitors can use to communicate with you.
- Products, Services, Resources – Static landing pages with any additional information that you want to include on your blog.
The guidelines to publish a new WordPress page:
A blog page provides static content or information to the readers. Standard pages that bloggers use include: About, Contacts, Products, or Services. A page also can be a cornerstone (or evergreen) content with information that continues to be relevant to its readers. For example, this guide you are reading right now.
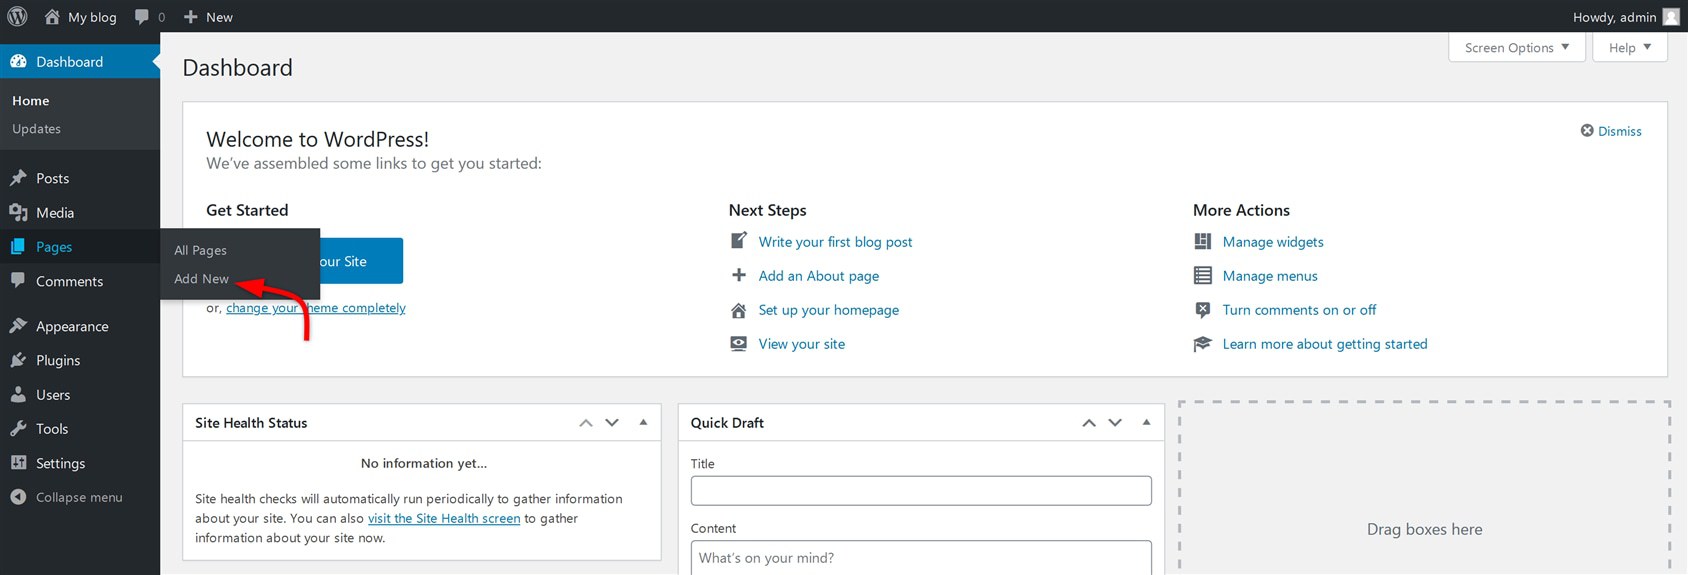
- To create a blog page, log in to your WordPress dashboard admin area using your login details (username and password).
- Hover your cursor over the “Pages” menu item on the navigation menu located on the left-hand side of the Dashboard. Click “Add New”.
 Read more:
Write your first blog post
Creating blog posts inside WordPress is nearly the same as creating pages. However, for a blog post WordPress lets you select categories and tags while pages don’t.
Wondering how you can write quality blog posts? It’s simple.
Here is a simple 3-step approach to making great content of any type:
- Point – State your main blog topic idea that you are covering.
- Prove – Give an example of the idea you are covering.
- Perform – Give a simple way to execute the idea.
Read more:The guidelines to publish a new WordPress post:
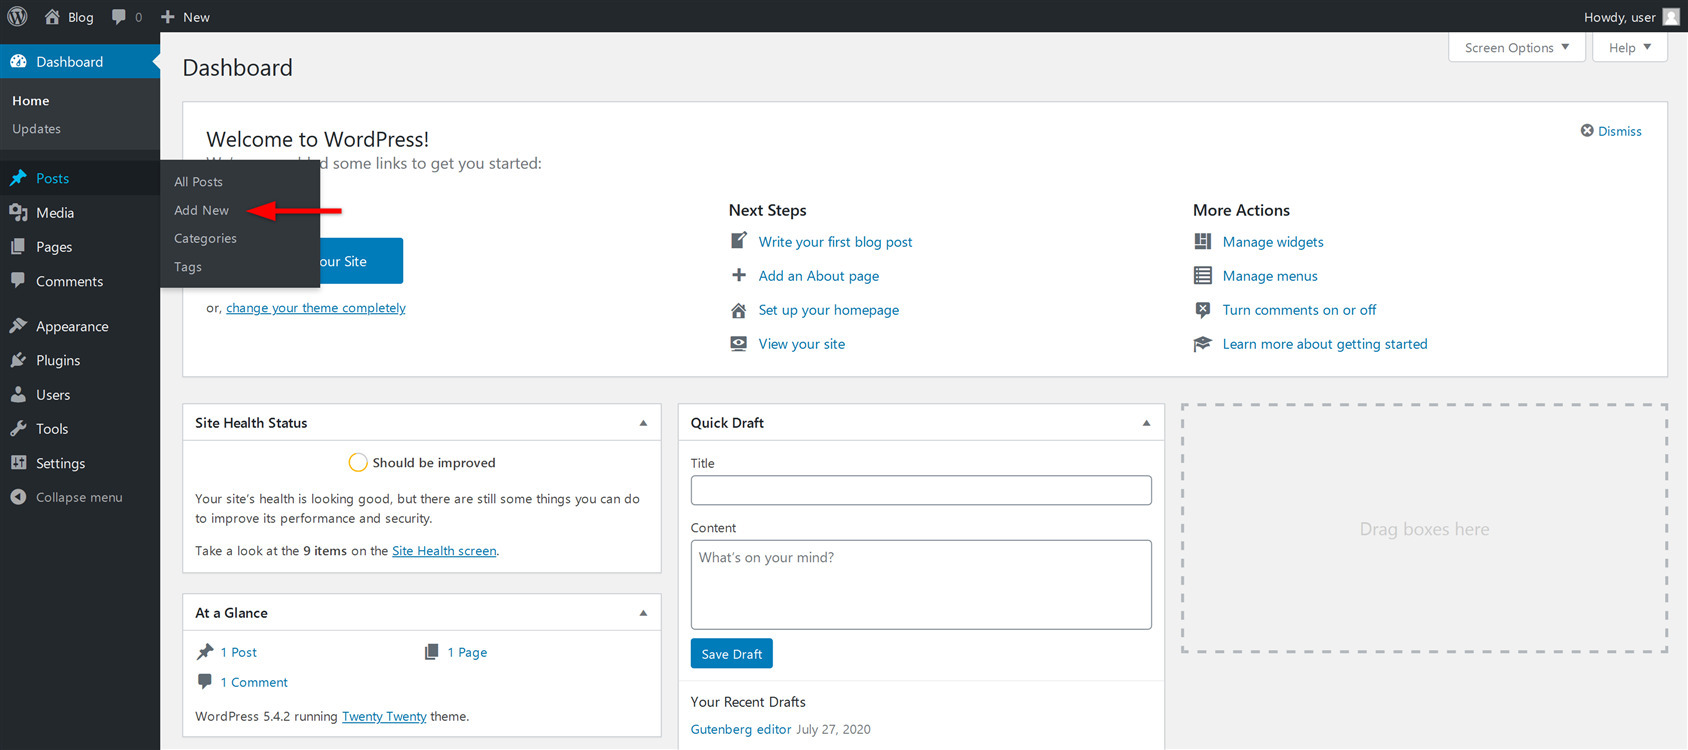
In your first blog post, you can take a moment and introduce yourself. Tell your readers who you are, what motivated you to blog, and what you will write. The title of the post could be “Welcome to my blog”.
- Inside the WordPress dashboard on the left side, you will see Posts menu item.
- Hover your mouse cursor (or click) on the Post item. Then select “Add New”.
Next, I’ll talk about how to optimize your content for search engines.
Step #7: Optimize your blog for search engines
Search engine optimization (SEO) is the process that website owners use to get more traffic to their web pages from search engines (such as Google).
According to recent studies, 53% of all traffic for websites comes from organic search (.pdf). This number shows how important it is to make sure that you optimize your WordPress blog for search engines.
SEO involves many different tactics and techniques. As a blogger, you will have to get familiar with these. I won’t be talking about any advanced processes here. As a bare minimum, you will have to do the following for every blog post or page you publish on your blog: perform keyword optimization and add SEO meta tags on all pages.
Keyword optimization
This is the process of researching and selecting the right set of keywords that you think people will type in a search to find information like yours online.
Ideally, keyword optimization should be performed for any blog post or page. It’s important to select the main keywords (and related words) that you want to target for each page and make sure that you include these (and related words) within the content. This way it will be easier for search engines to understand what a specific web page is about when they crawl it and you have a better chance to rank higher in search results.
Read more:SEO meta tags
When you publish a new blog post or page, you will need to add SEO meta tags for each piece of content.
These are the SEO title and SEO description tags. These tags are not seen on the actual page, but Google will use metadata to better understand what the webpage is about.

Example of Title and Description meta tags in Google search results. If you want to start ranking your content in search engines, this is an important step to complete. SEO tags should be prepared and added when you create a new page or a post inside WordPress. You can add SEO meta tags via free plugins, such as Yoast SEO.
The title tag length should be between 50-60 characters (this is what Google typically displays) and the meta description tag can be between 50-160 characters.
Read more:Step #8: Promote, market, and grow your blog
By now, you’ve learned how to start a blog, how to create blog content, and how to get it discovered by search engines.
It is important to understand that you can write the most compelling copy in the world and design a blog interface that would sell people their own shoes. However, if no one sees it, all of your hard work is in vain. So, you need to know how to promote your blog.
While the content and quality of your blog are very important to it’s success, at FirstSiteGuide we operate on a variation of the 80/20 rule.
Spend 20% of your time creating your content and the remaining 80% promoting your content.
This is especially true for new bloggers who are building up their organic traffic.
Before you start promoting your blog, check if it’s ready:
- Make sure that your content is live and ready for promotion.
- Test your blog on different devices (desktop, tablet, mobile) and browsers (Chrome, Firefox, Safari, and Microsoft Edge) to check that pages open correctly.
- Check your contact info and test your contact form to see if it works well.
- Test your social sharing buttons so that people can easily share your content.
- Ensure that you interlink your content so that people can easily find other important information on your blog.
- Give your visitors one or more ways to connect with you and subscribe to your email list.
- Set up Google Analytics to track your blog’s performance and visitors.
Let’s look closely at the basic promotion and marketing activities that you can apply to grow your audience once you build a blog.
Let everyone know about your blog
Get started by informing your friends, family, and colleagues about your new endeavor. Basically, you should let anyone know who might be interested in reading your content.
You should also do the following:
- Include your blog name (URL) in your email signature.
- Include it in your social media accounts or any online communities you are involved in.
- Use every opportunity to get the word out about your new undertaking.
Be active within your niche
Get active on relevant blogs, forums, groups, and social pages.
Blogger communities are a good way to connect with other bloggers in your niche. You can engage, build friendships, and help each other in spreading content.
Here are some popular activities you can do:
- Blog commenting. Start posting comments on other relevant blogs. It’s a great way to build relationships with top bloggers within your niche.
- Social media marketing. You should make use of the social media avenues that best fit your own niche and style. Choose the one (or ones) that best fit your needs and start promoting your content to grow your audience. Some of the most popular social media networks that bloggers use on a daily basis are Facebook, Instagram, and Pinterest.
- Guest blogging. Take the relationship a step further and offer to write guest blog posts for another website. Just be sure that you guest post on reputable sites and that the content is directly related to your niche. Guest posting is an excellent way to build an online presence.
Promoting your content through other platforms
Before your blog becomes popular and starts to grow, you should look into leveraging other platforms on the web that already have some audience and readership. To give you a better idea, here are some of the techniques that you can use:
- Bookmarking sites. Submit your blog content to bookmarking sites that can offer your content to a lot of potential viewers who are searching for information within your niche. You should do this every time you publish a new blog post to spread the word. Here are some popular social bookmarking and content curation sites: Scoop.it, Reddit, Flipboard, etc.
- Content republishing. You can publish the same or slightly repurposed content on platforms such as LinkedIn and Medium. It’s best to publish content on your blog first, wait a few days while it gets indexed by search engines (Google), and then you can start posting it on other platforms. Also, make sure to link back to your original article as a source. You can learn about a republishing strategy here.
- Repurpose content. You can repurpose your content, create graphics, slideshow presentations, audio files, or even videos and publish it all on the platforms that support different content formats. Here is how you can make 64 pieces of content in a single day (PDF).
Getting organic traffic from search engines
By now, you already know that it’s important to optimize your content for search engines but this goes beyond just Google.
In order to increase your organic traffic, you will have to learn how to get your content to rank higher in search results among different search engines, with Pinterest growing rapidly in popularity among niche site owners recently.
Google’s many updates have changed how bloggers promote their sites and we should all be focusing on creating varied streams of traffic.
There is no magic formula for higher rankings on any platform, but you should focus on the following factors:
- Create useful content for your readers, not search engines.
- Consistently create fresh and quality content.
- Make sure that the user experience is flawless.
- Ensure that your blog is secured (HTTPS), mobile-friendly, and loads quickly.
- Interlink your content and work on getting external links.
Advertising on the web (paid traffic)
Appropriate and well-informed use of paid media can help you to gain exposure and attention before your organic (naturally derived) traffic takes hold.
Paid traffic avenues include:
- Social media advertising on Facebook, Instagram, Twitter, etc.
- Search engine advertising via Google Ads, Bing Ads, or Pinterest Ads.
- Content discovery platforms such as Outbrain or Taboola.
Remember that you can always find other ways to promote your new blog.
Start building your email subscriber list
After starting a blog, you will begin attracting new readers and visitors. It’s a good idea to collect the email addresses of those who want to be notified when you publish new blog posts or share promotional offers. As people come to know and trust you, they will respond better to your promotional efforts.
Read more:Rely on the blogging fundamentals: a clear and well-functioning blog, focused and helpful information, engaging conversation, and practical advice. Your authority will come from helping and giving advice to your audience.
Read more:Step #9: Make money blogging (optional)
Monetization is the process of translating your blog activity into earnings.
You should keep in mind that blogging isn’t just about making money. It is about creating useful content and writing blog posts that will attract readers and make them come back for more.
When starting a blog think about adding content that will generate future income. Based on my own blogging experience, as well as from working with other bloggers, I’ve learned that specific kinds of content are more effective for generating money.
Here are types of content that you should consider writing and adding to your blog:
- Listicles or top list
- How-to guides
- Tutorials and manuals
- Product reviews
- Product comparisons
Now, let me show you some different ways how bloggers make money.
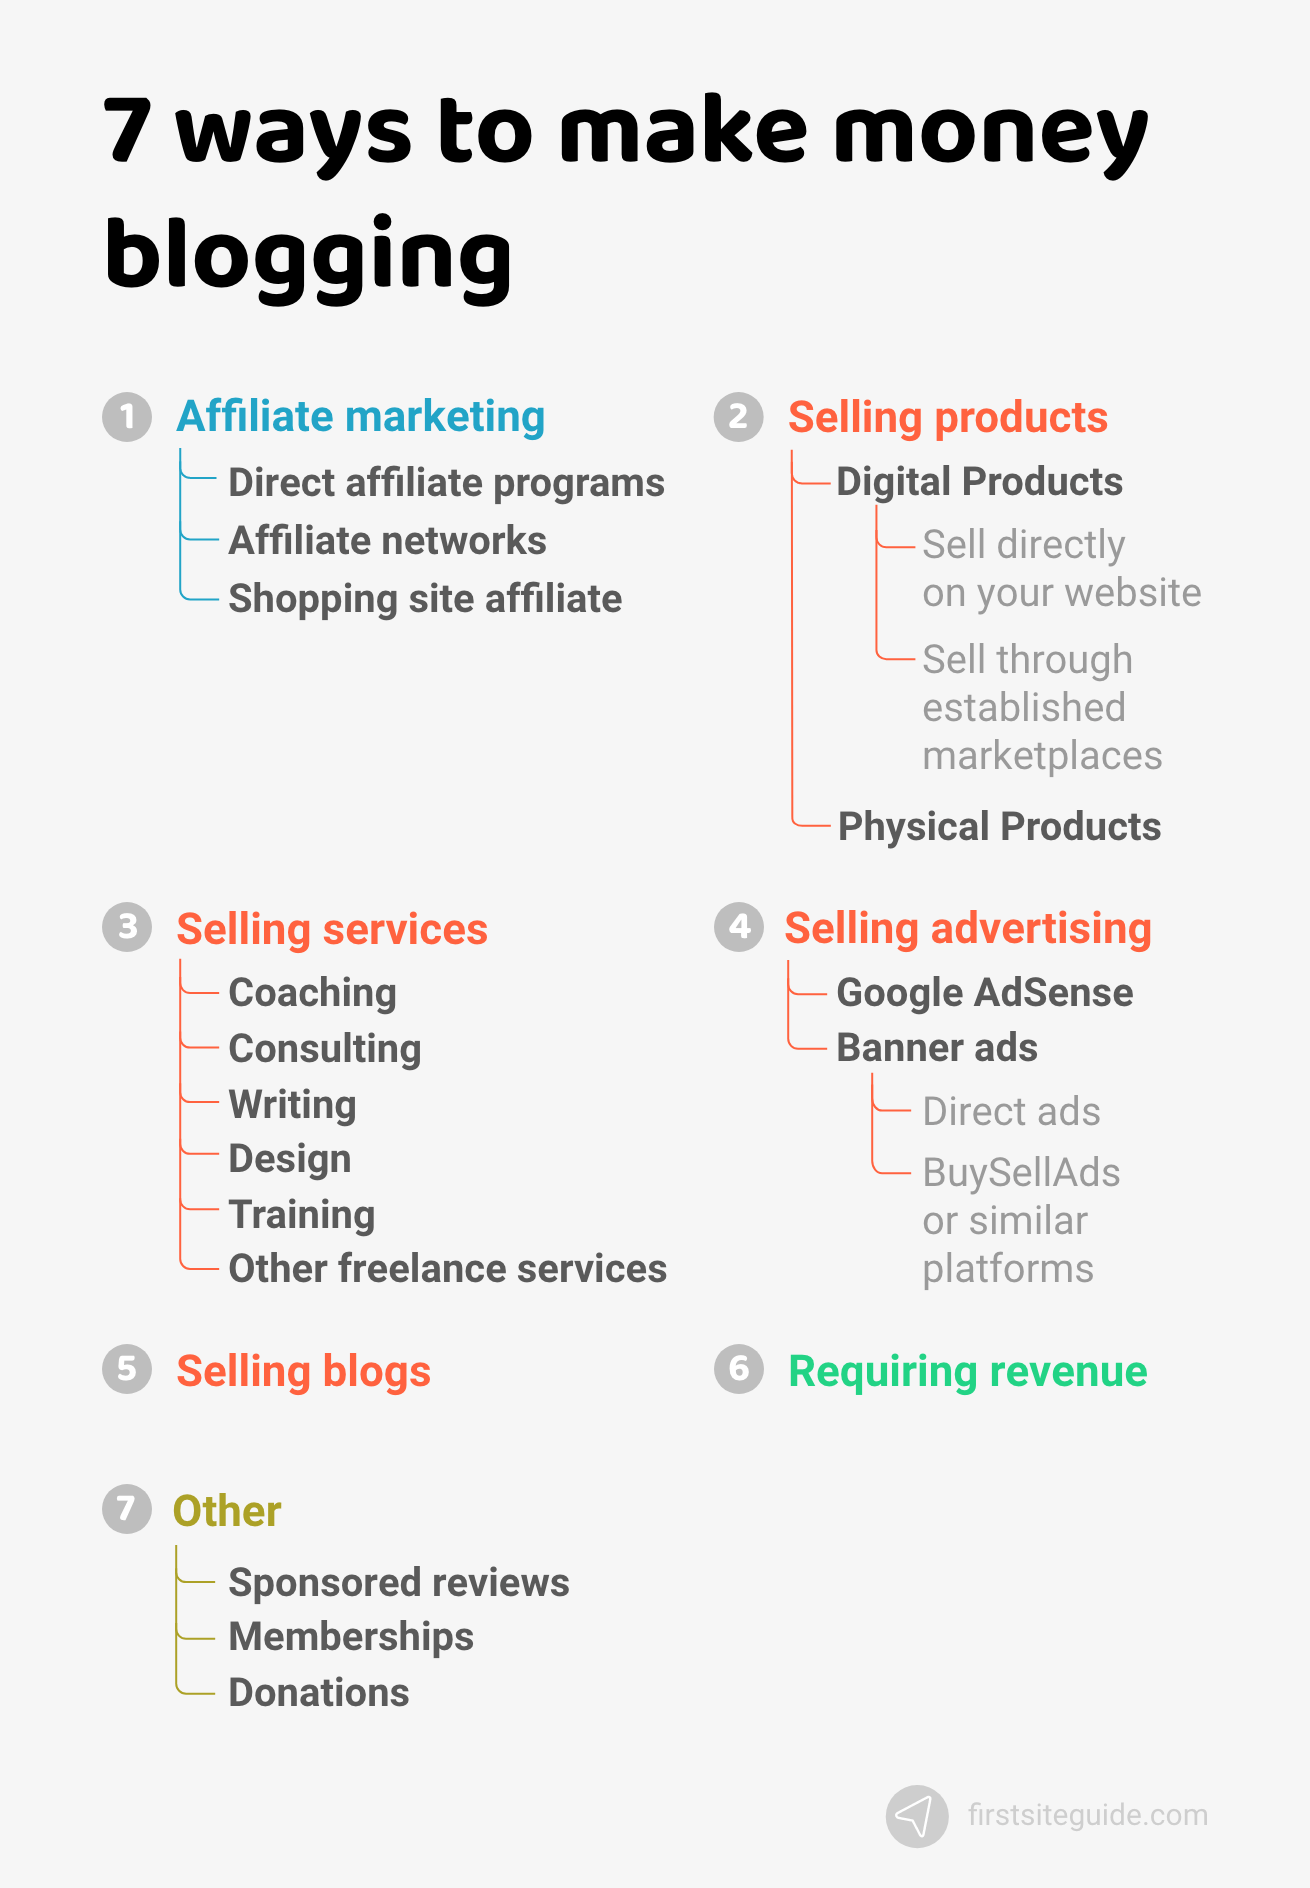
Blog monetization channels
Our case study of the blogging industry shows that 59.8% of bloggers make money through blogging.
But, how can YOU make money blogging? There are several options available, but below I’ll show you the best ways to earn income from a blog:
Running ads on your blog
There are seamless possibilities for you to run ads on your blog. Regardless of your niche, you can opt for ads that are specific to what you are writing about or ads that simply better serve your advertiser’s purposes.
Google Adsense, Mediavine, and Adthrive are some of the most popular choices for blog ads.
Enrolling in affiliate programs
Affiliate programs are ways of teaming up with retailers to promote their products and benefit from successfully carrying out sales through a commission.
Some things that you need to consider when enrolling in affiliate programs:
- The number of affiliate sales will strongly rely on the number of visitors you have.
- You need to be credible enough for your visitors to click on your links.
- You may want to consider placing a notice on your Terms of Use page that you do use affiliate links.
There are a few popular online platforms that offer affiliate programs if you want to get started, such as Amazon Associates, ShareASale, and ClickBank.
Selling your products and services
If you are creative and entrepreneurial, you could consider using your blog as a venue for selling your own products and services. This is an option especially as your blog grows in readership, authority, and popularity.
There are WordPress plugins, such as the WooCommerce plugin, that you can easily integrate into a blog and start using to sell products online.
Selling sponsored posts
Advertisers are always looking for exposure and are willing to pay you for placing a sponsored post on your blog.
Those posts usually promote advertiser products or services and are a good way to make money from your blog. In the future, if you’re able to build a popular blog and become an authority in your niche, the advertisers could approach you to publish their posts.
Read more:Above are the most popular choices to earn money. However, there are more ways to monetize your blog.
Consider the possibilities, and then choose the method or methods that best suit you and your audience.
As a minimum, you should – from the very start – begin compiling an email list of your readers through subscriptions. Then, when you are ready to recommend products, you will have ready access to those who want to hear what you have to say.
FAQs before start